
 CenterClick NTP Series Documentation - Getting Started
Main
Store
NTP Docs
o Features
o Hardware 200/250
o Hardware 220/270
o Getting Started
o Release Notes
o Front Panel Button
o Front Panel LEDs
o USB Console
o Admin CLI
o Using HTTPS
o SSH Authentication
o Client List
o Antennas
o Troubleshooting
o Graphs
o PPS Output
o Reimage 200/250
o Reimage 220/270
GPS14x Docs
Live Demos
Contact Us
Feedback and Bug Reports
Follow us on LinkedIn
Privacy Policy
Shipping and Tax
Returns and Warranty
Included in the Box
|
Supply Yourself
|
Setup
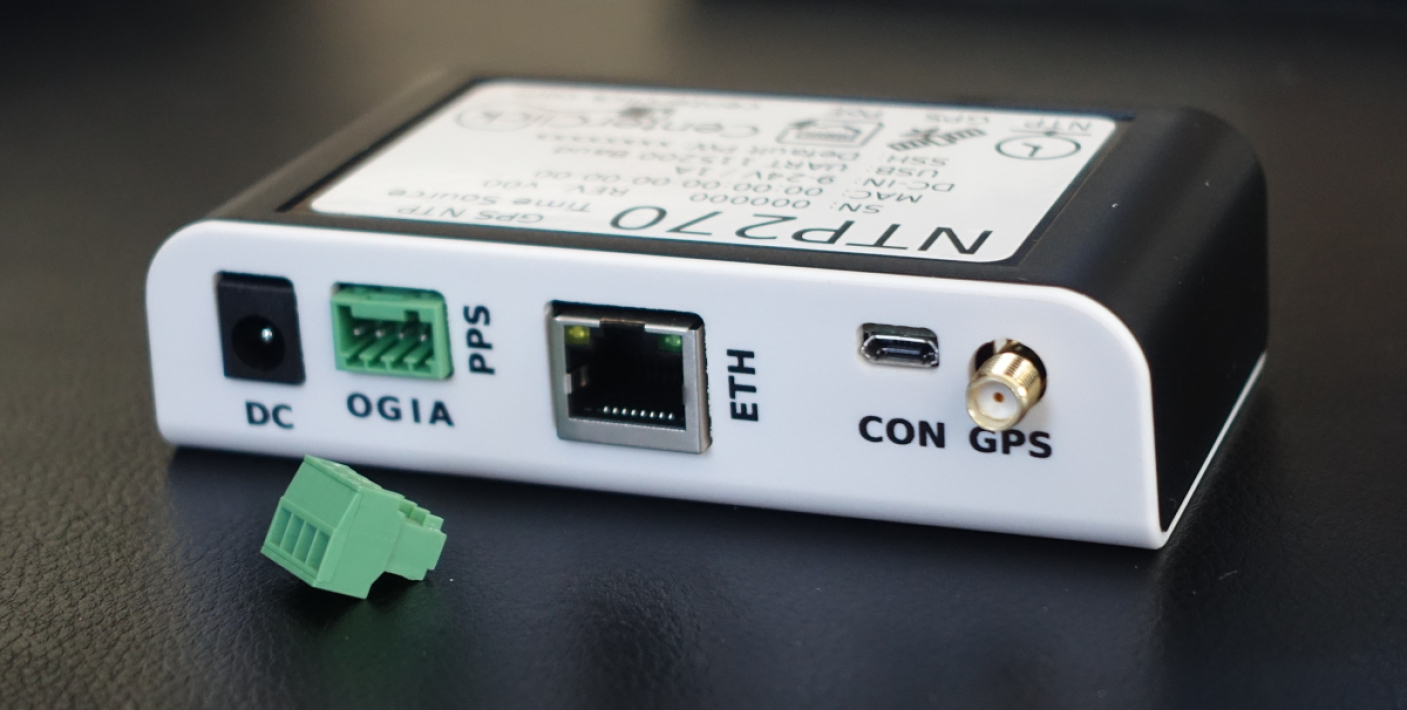
Connect the DC power supply, Ethernet cable, and antenna to the back.
Using the PPS input and output connector
If you would like to use the PPS input and/or output pins, please see the docs at https://centerclick.com/ntp/docs/pps_output for instructions for proper use.
Location and antenna placement
The NTP appliance and power supply are not watertight and should only be used indoors or a user-supplied watertight enclosure.
The included GPS antenna is water-resistant, features a built-in magnet and a 10ft cord. In most cases, the GPS antenna can lock to satellites from indoor environments. If you would like to purchase a waterproof outdoor antenna see the online docs for some recommendations.
First power up
Power backup for rapid boot-ups is implemented using a supercapacitor. On a cold boot where the supercap is discharged, it can take the GPS module 5-90 minutes or more to acquire lock especially if signal strength is low. If reception is strong, lock can be obtained in less than 1 minute.
Please be patient. The acquisition time is very dependent on signal strength, the best location for the antenna is near a window or edge of the building. Avoid placing it near metal cabinets, inside metal racks, or near equipment or HVAC ducting above. Also make sure the antenna puck isn't covered and place it on top of sheet metal to provide a good RF ground plane.
Connecting the Network
Both IPv4 and IPv6 are supported and, by default, DHCPv4 and DHCPv6/Autoconf6 are used to obtain network addresses automatically.
If you would like to use static addressing, this can be setup using the USB or SSH admin console.
Monitoring and Configuration
Determine IP address
You'll need to determine the IP address of the device to use the Web client, SSH, and configure your NTP clients.
Unless you set a static IP using the USB admin console or on your DHCP server, you will need to either lookup the IP address using the MAC address printed on the top of the device in your router or simply connect to the USB admin console and use 'show net' to see network status.
Web Interface
The web interface is read-only and provides monitoring status. By default, location data is displayed, however if you wish, you can turn on location data privacy for the HTTP interface using the admin console.
Enabling and Using SSH
Depending on how recently your device was manufactured, it may have a device-unique default admin password programmed at manufacturing time. If so, SSH is enabled by default and the device-unique default admin password is printed on the label which must be changed or disabled on first login. If not, SSH is disabled by default and you can enable SSH logins using the USB admin console. Both password and public key authentication are available.
USB admin console
Use the Micro-B USB port for configuring the device or debugging when the network is offline.
A serial console is presented over this USB port so you can use any terminal program and connect using 115200 baud N81 with no flow control. For driver and usage help see the online docs.
Configuring NTP Access Control
By default all clients can synchronize with the device, however, you can use the admin console to configure IP/MASK sets that can have additional permissions or fewer permissions such as blocking.
Software upgrade
Software upgrades can be performed using the admin console. By default, the device will auto-install software updates but you can disable this by config if you wish.
Configuring your NTP clients
Setup of your clients
You will need to point your clients to use the devices using NTP. This can be done using a DHCP option, modifying /etc/ntp.conf on Linux devices, or using a GUI on Windows or MacOS.
Broadcast/Multicast mode are also supported, but disabled by default. See the online docs for how to configure this.
Verification
You can verify if a client is using the device by viewing the NTP Clients link on the Web Interface which will list the IP of every client that has queried the device in the past 7 days.
More Information and Help
For assistance, further documentation, support, or to obtain the software release notes visit https://centerclick.com/ntp.
Your feedback is appreciated. Depending on where you purchased your device, we may or may not have your contact information so say hello if you would like. Online reviews on ebay or Amazon are always appreciated.
 Documentation |
 Contact Us |
 Follow us on LinkedIn |
 Review NTP220 |
 Review NTP270 |
Notices
This equipment has been tested and found to comply with the limits for a Class B digital device, pursuant to part 15 of the FCC Rules. These limits are designed to provide reasonable protection against harmful interference in a residential installation. This equipment generates, uses and can radiate radio frequency energy and, if not installed and used in accordance with the instructions, may cause harmful interference to radio communications. However, there is no guarantee that interference will not occur in a particular installation. If this equipment does cause harmful interference to radio or television reception, which can be determined by turning the equipment off and on, the user is encouraged to try to correct the interference by one or more of the following measures:
* Reorient or relocate the receiving antenna.
* Increase the separation between the equipment and receiver.
* Connect the equipment into an outlet on a circuit different from that to which the receiver is connected.
* Consult the dealer or an experienced radio/TV technician for help.
This device complies with Industry Canada ICES-003 class B requirements. Cet equipement est conforme a NMB-003 classe B de la norm Industrielle Canadian. CAN ICES-003(B) / NMB-003(B)