
 CenterClick NTP Series Documentation - Reimage
Main
Store
NTP Docs
o Features
o Hardware 200/250
o Hardware 220/270
o Getting Started
o Release Notes
o Front Panel Button
o Front Panel LEDs
o USB Console
o Admin CLI
o Using HTTPS
o SSH Authentication
o Client List
o Antennas
o Troubleshooting
o Graphs
o PPS Output
o Reimage 200/250
o Reimage 220/270
GPS14x Docs
Live Demos
Contact Us
Feedback and Bug Reports
Follow us on LinkedIn
Privacy Policy
Shipping and Tax
Returns and Warranty
How to Reimage NTP220 and NTP270
Follow these instructions to reimage your NTP220 or NTP270. You may have been told to do this due to corruption or to debug an issue. Different instructions apply to reimage a NTP200 or NTP250.
This procedure requires physical access to the appliance, a microSD card, and a laptop or computer with a microSD card reader.
To obtain a reimage image, please contact us so we can generate an image for you.
Image your microSD card
WARNING: this will destroy all data on your microSD card.
Linux Users
On a linux system you can use unzip and dd to image the microSD card. Determine which block device is the microSD card, in the examples below sdc is used.
ubuntu:/local# unzip aion_sdcard_2.16.0.zip
Archive:  aion_sdcard_2.16.0.zip
  inflating: aion2_2.16.0_sdcard.img
ubuntu:/local# dd if=aion2_2.16.0_sdcard.img of=/dev/sdc
131072+0 records in
131072+0 records out
67108864 bytes (67 MB, 64 MiB) copied, 26.9885 s, 2.5 MB/s
ubuntu:/local#
Windows Users
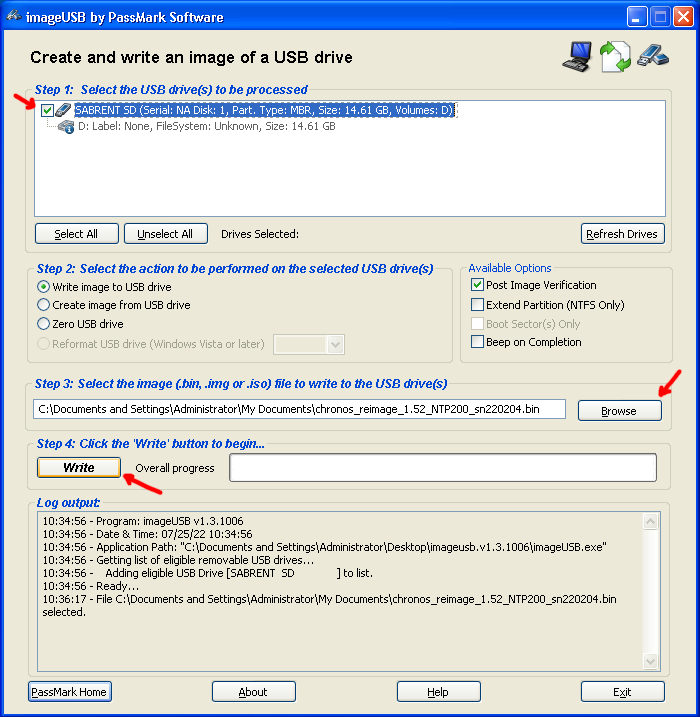
On a windows systems, we recommend using ImageUSB from PassMark.
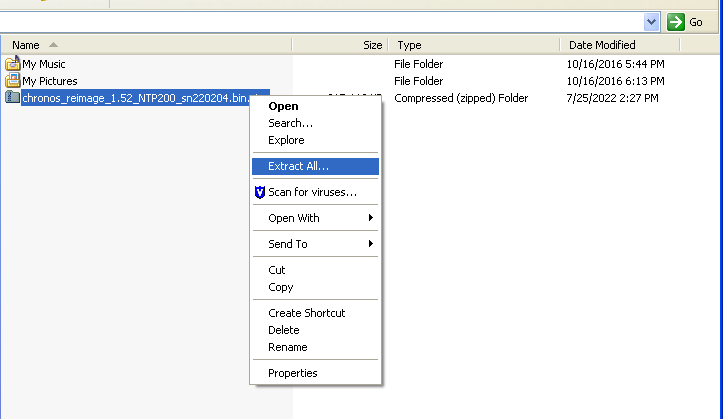
Unzip the compressed reimage image to obtain a .img file. WARNING: Windows defaults to hiding the file .zip extension even when it is still compressed.
Attach your microSD card reader, and open ImageUSB. Select the USB reader, Browse for the .img file, and click Write
Insert microSD card into Appliance
Install the microSD card, note that the card goes upside down, with the pin contacts on the top.
Power cycle the appliance
It is desirable to have the USB console connected, however it is not required.
Power cycle the device and observe the USB console (or LEDs). When booting from the microSD card, the device will enter reimage mode displaying the following prompt and the SYS and NTP LEDs will blink in an alternating pattern.
  ...Booting reimage image
  ...Press CMD button to start reimage...
To initiate the reimage, press the CMD button. The SYS and NTP LEDs will stop blinking and the reimage will start:
  ...Press CMD button to start reimage...
  ...Mounting uSD
  ...Checking uSD contents
awboot-boot-spi-4k.bin (49152):    GOOD
sun8i-t113-aion-0.dtb (35840):     GOOD
sun8i-t113-aion-1.dtb (35840):     GOOD
zImage (4100096):                  GOOD
rootfs.squashfs (41943040):        GOOD
  ...Checking NAND MTD contents
awboot-boot-spi-4k.bin (49152):    GOOD
awboot-boot-spi-4k.bin (49152):    GOOD
sun8i-t113-aion-0.dtb (35840):     UPDATING GOOD
zImage (4100096):                  UPDATING GOOD
  ...Checking NAND UBI state
  ...Checking NAND UBI contents
rootfs.squashfs (41943040):        UPDATING GOOD
  ...Mounting devices
  ...Installing backups
awboot-boot-spi-4k.bin (49152):    GOOD
sun8i-t113-aion-0.dtb (35840):     GOOD
sun8i-t113-aion-1.dtb (35840):     GOOD
zImage (4100096):                  UPDATING GOOD
rootfs.squashfs (41943040):        UPDATING GOOD
  ...Unmounting devices
  ...Unmounting uSD
  ...Reimage finished
  ...Press CMD button to reformat uSD or remove uSD to retain reimage...
Once complete, the SYS and NTP LEDs will blink in unison. You can either remove the microSD card as is (retaining the custom reimage image), or press the CMD button again to have the microSD card reformatted for generic use.
If you press the CMD button the card will be reformatted and then the device will reboot. If removed, the device will automatically reboot.
  ...Reformatting uSD for generic use
  ...Rebooting
If succesful, the device will now boot normally. Note that reimaging will reset the device to defaults.
  ...Booting
  ...Checking Storage
  ...checking flash: Micron SLC NAND 512MiB

  ...reimage detected
  ...resetting to defaults
  ...rebooting

  ...Booting
  ...Checking Storage
  ...checking flash: Micron SLC NAND 512MiB
  ...Checking RTC: [Fri Mar 22 19:39:27 2024] OK
  ...NTP220 SN 240203 HW v3 SW v2.16.0
Enabling SSH...
Enabling HTTP...

WARNING: Default SSH password in use.
 [d]isable ssh, [c]hange password, [e]xit, [s]hutdown? [d/c/e/h] d
Disabling SSH...
NTP220>